

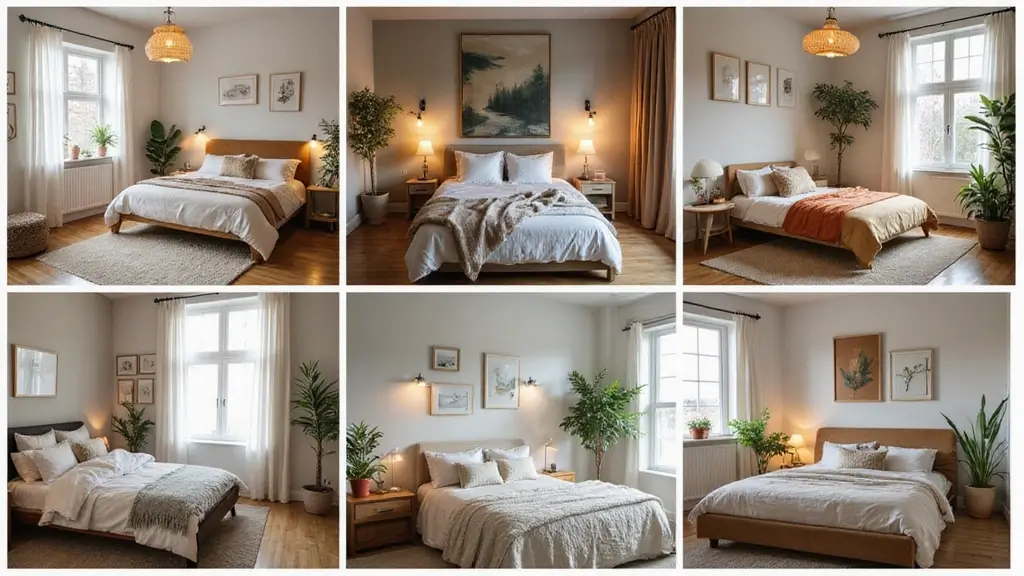
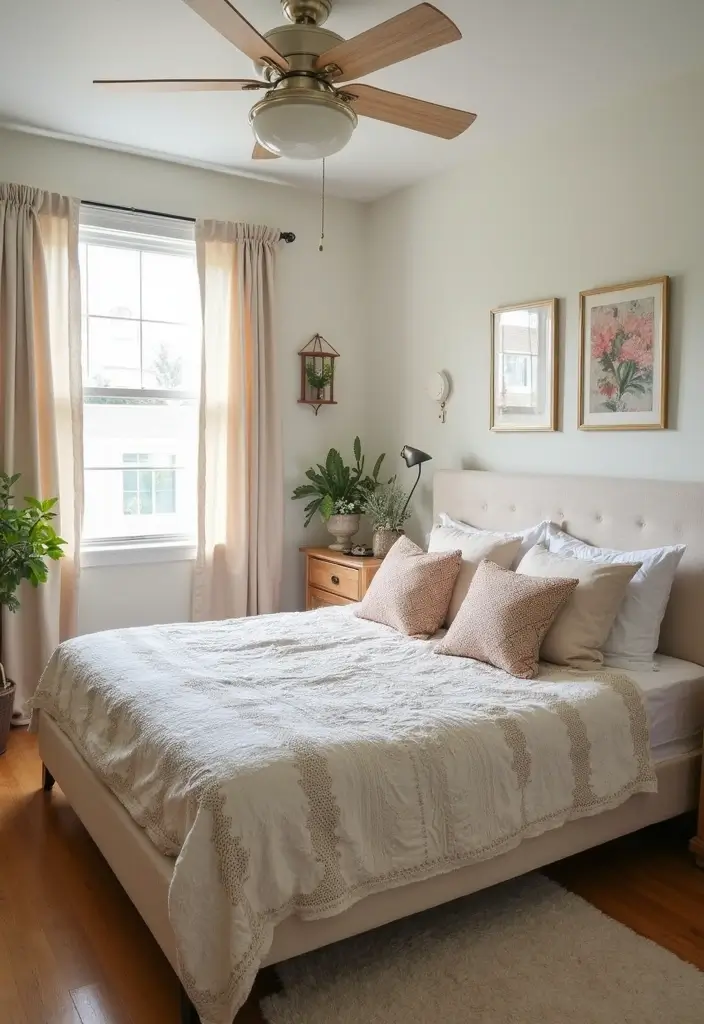
I put this together because a cozy bedroom should feel like yours, even when money is tight. I know that itch to refresh a space but also the pause you feel at the price tag. So I pulled together 25 DIY ideas that are simple, affordable, and actually doable for real people.
If you live in a small apartment, a dorm room, or you just want a calmer retreat at home, this post is for you. If you care about texture, light, and small wins that make a room feel personal, you belong here. This is for folks who want style they can build themselves without blowing through their savings.
What you’ll get is a practical collection that covers walls, lighting, fabrics, and smart storage. Each idea comes with clear steps you can follow this weekend. You’ll learn how to pick a warm color plan, mix natural textures, and turn thrift finds into something fresh.
You’ll read about simple moves you can actually try. Think lighting that softens the room, fabric that adds comfort, and little corners that feel inviting. You can swap pillow covers, hang a string of lights, or turn a plain shelf into a cozy plant nook. A few small changes can make the whole mood shift.
Here is how to start: pick one quick win and do it first. Measure your space, set a tiny budget, and gather a few easy supplies. Use peel-and-stick options if you rent. Keep the mess low and the progress steady, so you stay motivated.
By the end, you’ll see how easy it is to shape a space you love without breaking the bank. You’ll gain confidence to keep layering texture and color, building a room that feels warm, personal, and truly yours.
Contents
- 1. Fabric-Covered Headboard
- 2. DIY Wall Art
- 3. Upcycled Nightstands
- 4. String Lights for Ambiance
- 5. Personalized Photo Collage
- 6. Repurposed Plant Holders
- 7. DIY Bedroom Curtains
- 8. Painted Dresser Drawers
- 9. Hanging Wall Shelves
- 10. Upcycled Crate Storage
- 11. DIY Bedspread
- 12. Washi Tape Decor
- 13. Cozy Blanket Ladder
- 14. DIY Rug
- 15. Handmade Dreamcatcher
- 16. DIY Headboard Wall Mural
- 17. Cozy Reading Nook
- 18. Decorative Throw Pillows
- 19. Personal Memo Board
- 20. DIY Candle Holders
- 21. Painted Furniture Accents
- 22. Upcycled Window Frame
- 23. Handmade Bath Tray
- 24. DIY Closet Organizers
- 25. Wall-mounted Folding Desk
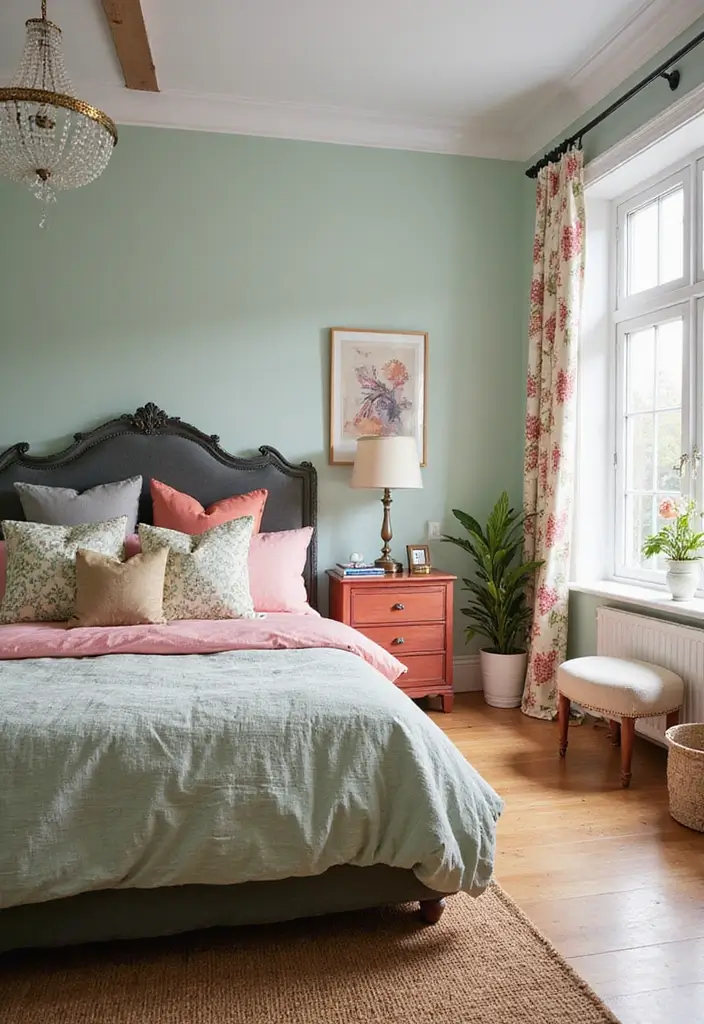
1. Fabric-Covered Headboard
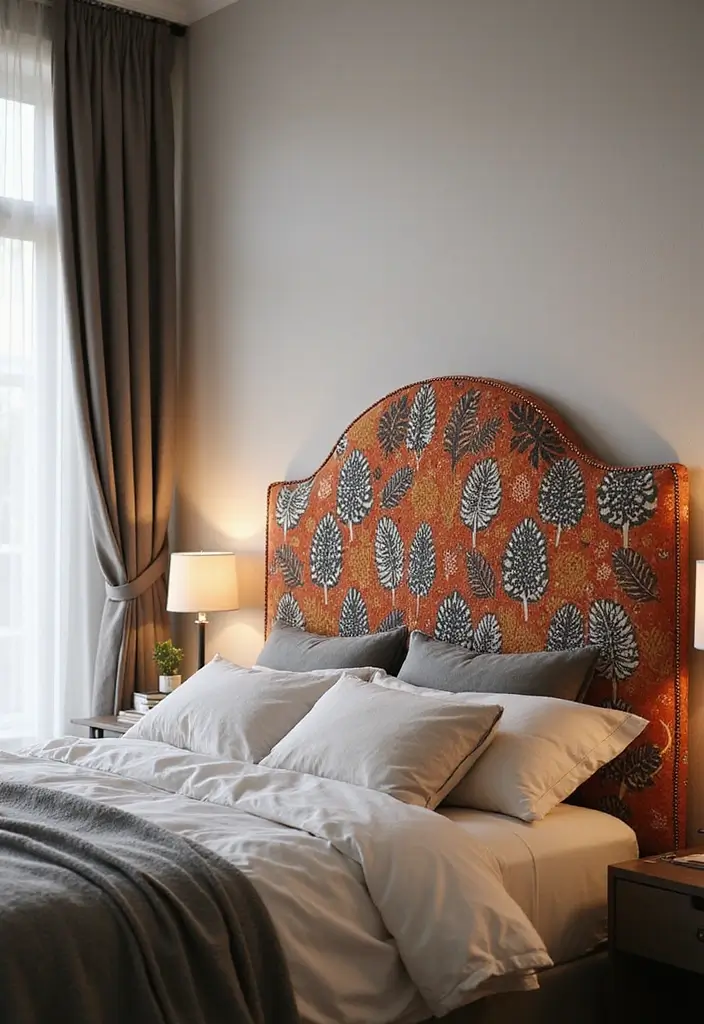
Does your bed look plain on your cluttered budget? A fabric-covered headboard can lift the whole room. It adds texture, warmth, and a focal point you can touch.
Here is why it works. A soft surface makes late-night reading more comfy. It hides a less-than-perfect wall behind it. And you can switch styles anytime by changing the fabric.
– Plywood sheet, wide enough for your bed
– Foam padding, 2 to 3 inches thick
– Durable fabric you actually like
– Spray adhesive or wood glue and a staple gun
– Scissors, a ruler, and a staple remover for tweaks
1) Cut the plywood into the shape you want. A simple rectangle is easiest, but a low arch or curved edge looks stylish.
2) Glue on the foam. Press it flat and let the glue dry.
3) Wrap the fabric around the board. Staple at the back. Start in the middle top, pull tight, and work down each side.
4) Mount the finished panel to the bed frame or the wall. Use sturdy brackets or screws that fit your layout.
Tips:
– Pick a fabric that complements your duvet and pillows.
– Choose a material that is durable and easy to wash.
Unique Insight:
– A bold color on the headboard can shift the mood of your whole room.
With these steps, you can DIY a headboard that feels like a store find without breaking the bank. It’s a small change with a big impact.
1. Fabric-Covered Headboard
Editor’s Choice

Balsa Wood Sheet, 5 Pack Plywood Sheets, Basswood Sheets 12X12X1/16 Inch…

GoTo Foam 1″ Height x 24″ Width x 72″ Length 44ILD (Firm) Upholstery Cus…

Arrow T50 Heavy Duty Staple Gun for Upholstery, Wood, Crafts, DIY and Pr…
2. DIY Wall Art
You want a bedroom that feels like you without a big price tag. DIY wall art helps you get there fast. With canvas, paint, and a little imagination, you can make art that matches your space. Here is why this works: you pick colors you love and you control the size and finish. Keep a simple palette to make planning easy.
Let’s break it down. Start with a small kit. You need a canvas or a sturdy board, acrylic paints, brushes, and a little tape for clean lines. Add string for texture, plus fabric scraps or wallpaper pieces for extra depth. A basic frame or clip board makes it easy to swap art later. You can test ideas quickly and see what fits your wall.
List of Ideas:
– Abstract paint splashes.
– Leaves and pressed plants for a nature feel.
– Framed fabric swatches from favorite clothes.
– Stenciled quotes on a small panel.
– Simple string art shapes on wood or canvas.
Unique Insight:
A gallery wall with frames of different sizes looks lively and personal. Mix vertical and horizontal frames for balance.
Next steps: pick one idea, set a timer for about an hour, gather supplies, and finish a piece. Hang it, adjust spacing, and enjoy the quick glow of a new focal point.
2. DIY Wall Art
Editor’s Choice

Acrylic Paint Set Canvas Art Paints 24 Colors Perfect Paint Finish (0.41…

KEFF 24-Pack Canvas for Painting, 6 of 5×7, 8×10, 9×12,11×14 Painting Ca…

Paint Brushes Set of 24 Pieces Wooden Handles Brushes with Canvas Brush …
3. Upcycled Nightstands
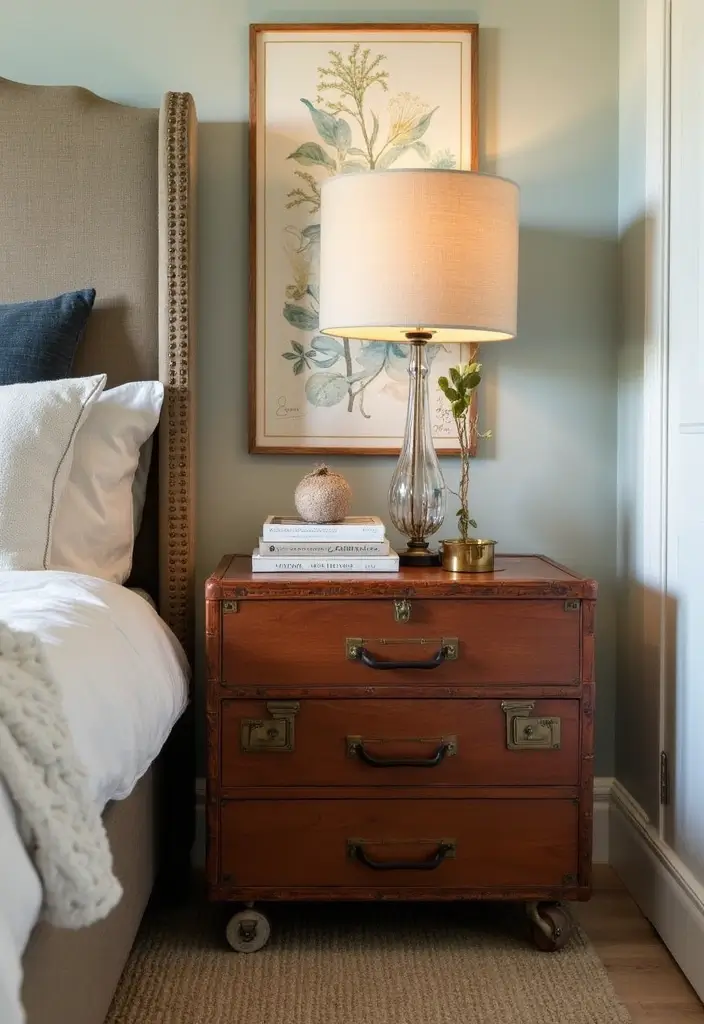
Want a nightstand that fits your budget and your style? Upcycled nightstands give you charm without spending a lot. Here is how to do it.
Start with a thrifted piece or a table from your garage. Clean it well, sand rough spots, and wipe away dust.
Choose a finish you like: paint for a bold look or wallpaper for pattern. Swap the knobs to change the mood in seconds.
If you want a playful option, turn an old suitcase into a nightstand by resting it on small legs or stacking books under it.
Prime the surface, apply a couple coats of paint, and seal with a clear finish. Measure your height so it sits at the right level next to your bed. Add soft felt pads under the legs to protect floors.
If the piece has a drawer, paint the inside a bold color or line it with simple fabric. For a mid century look, you can add tapered wooden legs.
Keep supplies ready and you can finish this in a weekend.
Tips:
– Look for unique shapes that catch your eye.
– Choose colors that fit your decor theme.
Unique Insight:
Vintage pieces carry marks of the past, making your room feel warm and personal.
3. Upcycled Nightstands
Editor’s Choice

ALL-IN-ONE Paint, Durable cabinet and furniture paint. Built in primer a…
Royal Kraft Vintage Multicolor Painted Ceramic Pull Knobs for Kitchen Ca…

Scotch Felt Pads 162 PCS Beige, Felt Furniture Pads for Protecting Hardw…
4. String Lights for Ambiance
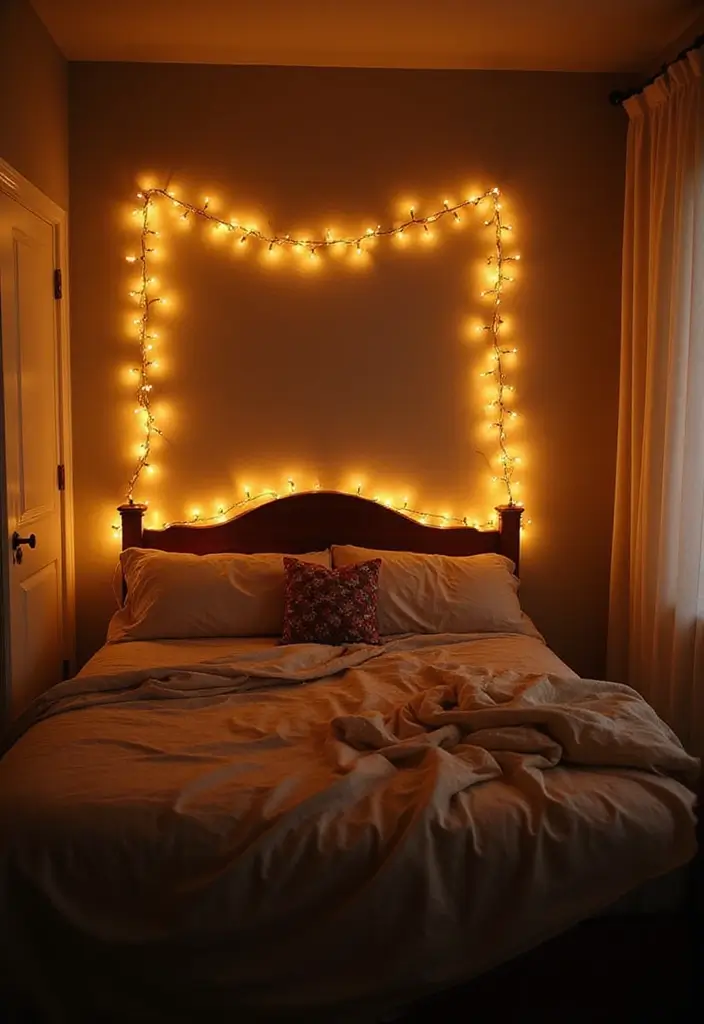
You want a cozy bedroom that feels magical without breaking the bank. String lights can do it. They are cheap, simple to install, and they cast a soft glow that helps you unwind.
Here is how to use them. Hang them above the bed to frame your space. Clip them along window frames for a gentle outline. Run them along the walls in a loose, curved path to add depth. For a quick setup, drape a line from one ceiling corner to another.
The light options matter. Fairy lights give a delicate sparkle. Colored lights set a mood—cool blue for calm, warm amber for coziness. Warm white works well every day.
Installation Tips:
– Use adhesive hooks to avoid wall damage.
– Start with a base layer, then add strands for depth.
– Test the layout before you press to secure each piece.
Unique Insight: Pair the lights with plants to boost the natural feel. A small fern, pothos, or trailing ivy catches the glow and softens the room.
Next steps. Add a simple timer, so the lights turn off on their own. Tidy the cords and keep the look clean. You’ll have a warm, inviting space you can enjoy every night, tonight.
4. String Lights for Ambiance
Editor’s Choice

Brightown 12 Pack LED Fairy Lights Battery Operated String Lights – 7ft …

Minetom Fairy Lights Color Changing – 33FT 100 LED String Light with Rem…

Adhesive Hooks Kitchen Wall Hooks – 24 Packs Heavy Duty 24lb(Max) Nail F…
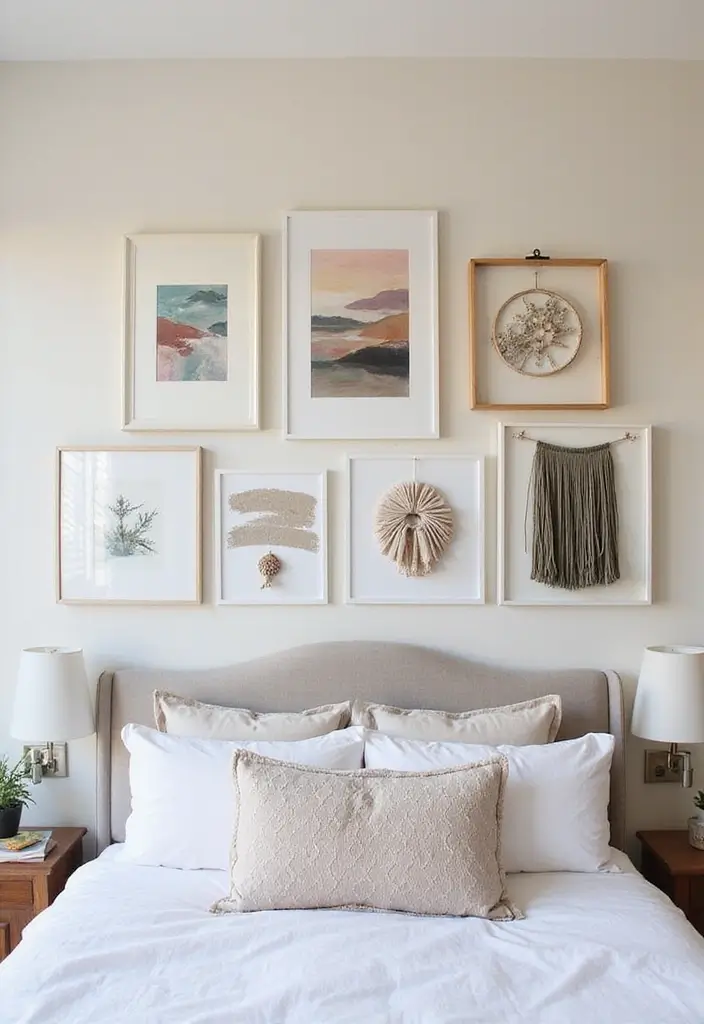
5. Personalized Photo Collage
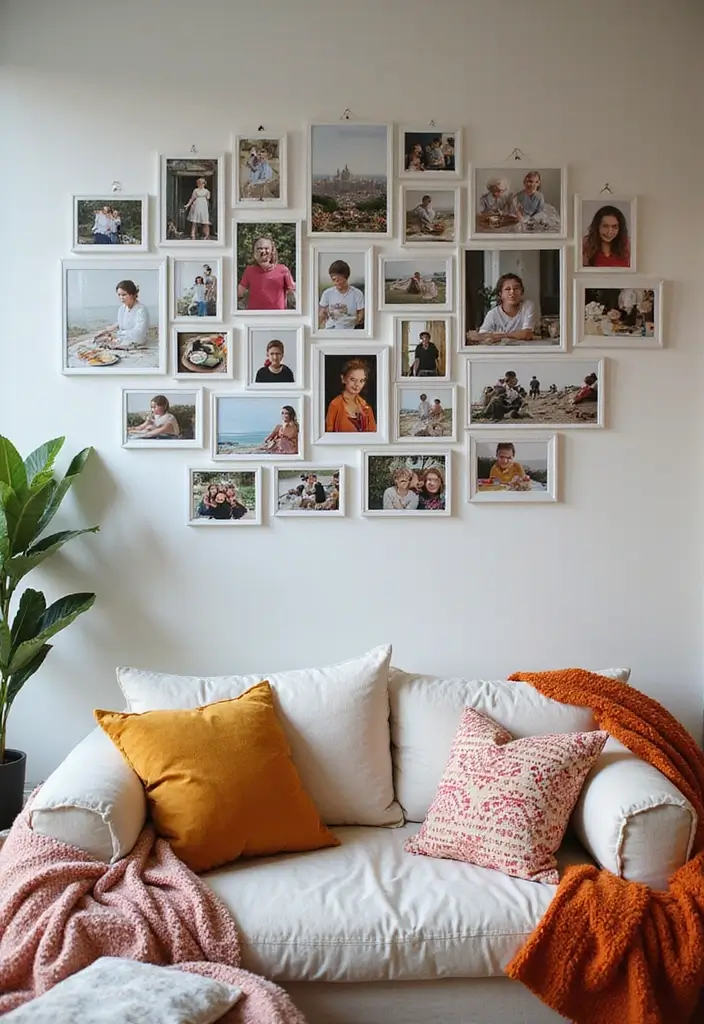
If you want a personal touch in your bedroom without spending a lot, a personalized photo collage on the wall is a smart move.
Here is why it works: it turns memories into daily mood, it is easy to update, and it fits any wall size. Now, plan your display.
– Gather 8 to 12 prints of your favorite moments. Pick a theme like travel, family, or a year in review to keep things cohesive.
– Decide how to show them. A casual look can use washi tape, while a polished feel uses frames. For renters, go with removable mounting strips.
– Mix sizes and orientations. Use square 4x4s, 5x7s, and a couple of 8x10s to add variety.
– Map out your layout. Try a tight grid or a loose cluster. Measure the wall and mark key spots with painter’s tape.
Tips:
– Harmonize colors by balancing warm and cool tones.
– Vary frame styles or add mats for depth.
Unique Insight:
– Leave room for new memories by reserving blank spaces or a rotating pocket.
– Swap in new photos every few months to keep the look fresh.
Think of it as a story wall you can update.
Materials and setup:
– Printed photos, frames or no frames, washi tape or mounting strips.
– A ruler, pencil, and a level help keep things straight.
Next steps: pick your theme, pull photos, mock the layout on the floor, then hang and enjoy a cozy, personal vibe.
5. Personalized Photo Collage
Editor’s Choice

LUCKYLIFE Picture Frames Collage Wall Decor 10-Pack, Gallery Wall Frame …

Washi Tape Set 30 Rolls, Decorative Tape, Colored Tape, Scrapbook Tape, …

Command 10 lb Medium Picture Hanging Strips 16 Pairs (32 Command Strips)…
6. Repurposed Plant Holders
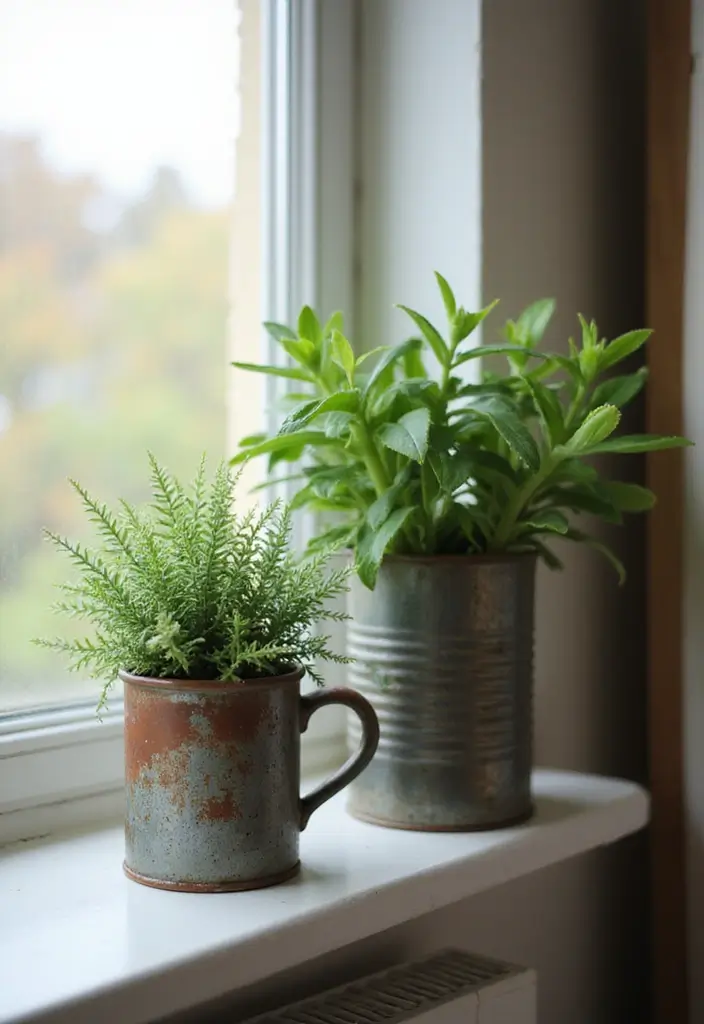
Your bedroom needs life, but you want the look without the big price tag. Repurposed plant holders can do it fast. Here is why they work: they turn things you already own into stylish planters. You can move them around as you refresh the room.
Choose containers you already have. Old mugs, tin cans, or baskets can become plant holders. Add drainage holes to avoid soggy roots. If you prefer not to drill, use a liner or a small plastic pot inside to keep water from leaking. Paint them to suit your style or wrap them in twine for a rustic touch. Simple tools, big impact.
Plant Ideas:
– Succulents for low maintenance.
– Ferns for a lush, green backdrop.
Unique Insight:
Group different sizes of plant holders together for a mini indoor garden.
Next steps.
– Decide where you want to display them: a shelf, dresser, or sunny window ledge.
– Keep water in check with a small tray or saucer under each holder.
– If you like hanging displays, use sturdy twine or lightweight wall hooks.
With a few cheap tweaks, you gain a fresh, cozy vibe that fits your budget. Try three in a cluster on a shelf this weekend and see how it transforms the room.
Transform your bedroom with DIY magic! Repurpose old containers into stylish plant holders and watch your space come alive without breaking the bank.
6. Repurposed Plant Holders
Editor’s Choice

Utopia Home – Plant Pots Indoor with Drainage – 7/6.6/6/5.3/4.8 Inches G…

Vanhench 805FT Natural Jute Twine String, Bulk Hemp Jute Rope Cord Twine…

30 Packs 4 Inches Small Clear Plant Saucers for Indoor Outdoor Use Heavy…
7. DIY Bedroom Curtains
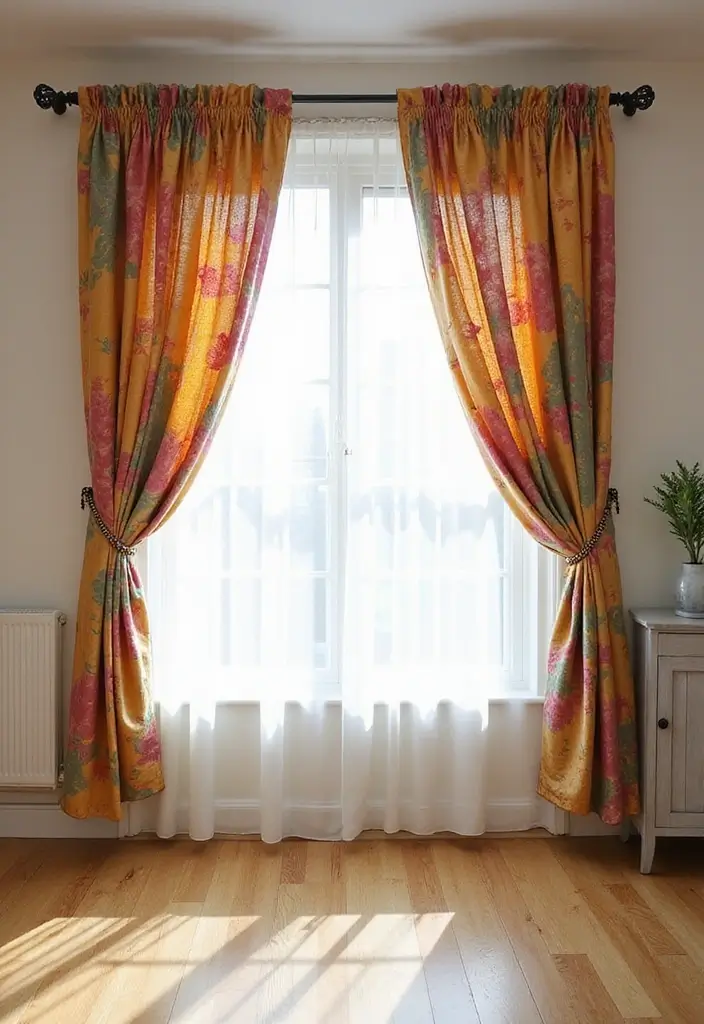
Your bedroom windows can feel plain and cold. DIY curtains give you color, texture, and a touch of you, all on a small budget. You can make them from bed sheets, fabric scraps, or old tablecloths.
First, measure your window. Add about 6 to 10 cm for hems. Cut to size, then sew or simply fold and finish the edges. Attach the panels to a rod with clips or rings for fast hanging.
Choose the look you want. Bold colors or patterns create a focal point. Sheer fabrics let light drift through while still giving you privacy. Layer with a solid curtain for extra depth.
Tips:
– Use curtain clips for easy hanging.
– Layer with sheer and opaque fabrics for depth.
Unique Insight:
Adjustable curtains let you tweak light and privacy. Pair a flexible rod with tiebacks so you can pull the panels back on sunny days.
Next steps: pick a window to start, gather sheets or scraps, and test one panel before cutting the rest. With a little sewing or careful hemming, you’ll gain a finished look that fits your room and your budget.
If the first try doesn’t look right, tweak color and length, and adjust layers until the room feels complete.
7. DIY Bedroom Curtains
Editor’s Choice

40 Pack Curtain Rings with Clips, Drapery Clips with Rings, Drapes Rings…

Black Shower Curtain Rod 31 to 80 Inch,1 Inch Diameter Adjustable Spring…

SpaceDresser Basic Rod Pocket Sheer Voile Window Curtain Panels White 1 …
8. Painted Dresser Drawers

If your bedroom feels dull, you can refresh the dresser drawers with paint without a full redo. It’s quick, cheap, and stylish.
Here is how to do it. Start with the fronts only. Pick a color that fits your room and pops from the rest of the furniture. A blue, a warm terracotta, or a black and white pattern can change the vibe fast. Keep the other parts of the dresser plain for contrast.
Prep matters. Wipe away dust, wash with mild soap, and let it dry. Lightly sand the fronts so the paint grips. Apply a wood primer and let it dry completely before painting.
Paint in thin coats. You may need two or three. Let each coat dry before the next. If you want a softer look, chalk paint gives a matte finish with less prep.
Tips:
– Tie the drawer color to a room accent for a cohesive feel.
– Use painter’s tape for clean edges.
Unique Insight:
– Chalk paint works great on older wood and hides small scratches.
Next steps: seal the paint with a clear top coat if you want durability. Then reattach hardware after it dries. Enjoy a fresh look. And it will last.
8. Painted Dresser Drawers
Editor’s Choice

Rust-Oleum 206540 Chalkboard Brush-On Paint, 30 oz, Black


4 Rolls Premium Painters Tape, Blue Tape, Masking Tape, Paint Tape for M…
9. Hanging Wall Shelves
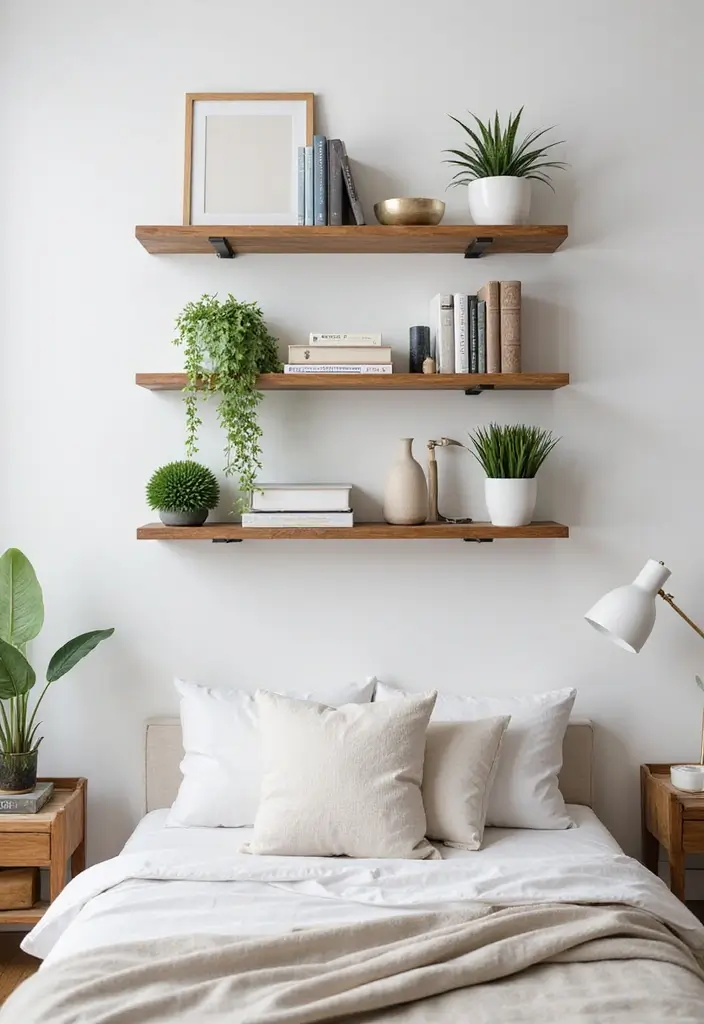
Are you looking for more storage without clutter? Hanging wall shelves give you space and style. They sit close to the wall, so your floor stays clear and the room feels bigger. You can make them yourself with wood and rope, or with simple brackets.
Here’s how to build and mount them.
– Materials: wooden boards (3/4–1 in thick, 12–24 in long), strong rope or metal brackets, screws, wall anchors, a drill, a level.
– How to install:
1. Find studs for a strong hold. Mark spots on the wall.
2. If you use rope: drill two holes near each end of the board. Thread rope through and tie tight knots.
3. If you use brackets: mount the brackets at the marked spots, then lay the board on top and secure with screws.
4. Hang the shelf by the rope ends or by the brackets. Use a level to keep it straight.
5. Test with a light weight, then add more.
– Display ideas: books, small plants, decorative items. Mix items across shelves for depth.
– Tips:
– Securely anchor shelves to studs or walls.
– Mix and match shelf styles for visual interest.
– Unique Insight: Use decorative baskets on the shelves to store smaller items neatly.
Elevate your space without breaking the bank! DIY hanging wall shelves add both style and storage while keeping your floor clear – the perfect solution for a clutter-free bedroom.
9. Hanging Wall Shelves
Editor’s Choice

HOOBRO Floating Shelves for Wall, Wall Mounted Shelf Set of 2, 15.7″ Han…

HOME MASTER HARDWARE 12 inch x 8 inch Heavy Duty Shelf Brackets, Load Ca…
Storage Basket for Organizing, Woven Baskets for Storage, Rectangle Deco…
10. Upcycled Crate Storage
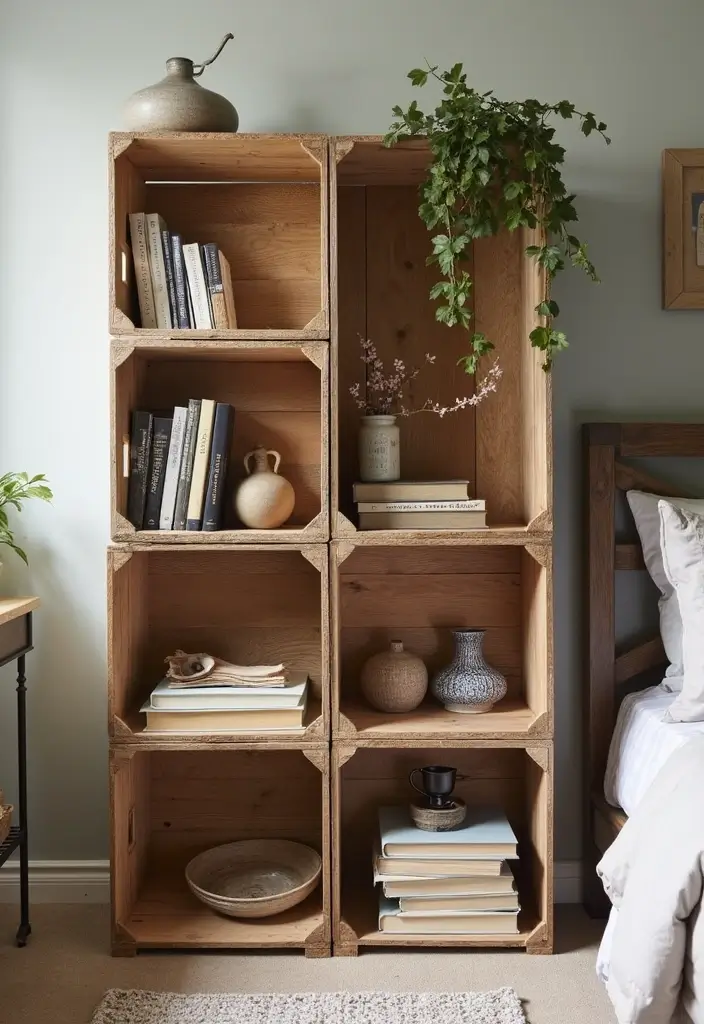
You want storage that is cheap, sturdy, and easy to style. Upcycled wooden crates hit all three. They bring a bit of rustic charm and lots of function. Here is why they work well in a bedroom:
– They can be stacked to make shelves, a tiny wardrobe, or a nightstand.
– They are light enough to move, but strong enough for books, shoes, or blankets.
– They look great with a simple stain or a splash of color.
What you need to get started
– A few wooden crates or fruit crates you can find secondhand or at a yard sale.
– Sandpaper to smooth rough edges.
– Your choice of stain, paint, or even whitewash.
– A clear sealant for protection against spills and dust.
– Small brackets or long screws to hold crates together if you want a tall unit.
– Optional liners or fabric to brighten the inside.
Here is how to put it together
– Prep the crates: sand all rough spots and wipe away dust.
– Finish the look: stain for a natural vibe, paint for a bold pop, or whitewash for a light touch.
– Build your unit: stack crates in a single column, side by side, or in a zigzag pattern.
– Secure as needed: add brackets or screws to keep the stack steady.
– Add details: place a fabric liner inside each crate for color or pattern.
Tips to make it last and feel right
– Use a clear sealant on all painted or stained surfaces so colors stay true.
– Mix orientations: stack some crates flat, others on their sides for visual interest.
Unique Insight
– Line the inside of a crate with fabric or paper to surprise the eye when you open it.
Next steps
– Decide where this shelf or nightstand will live in your room.
– Choose finishes that match your bed, rug, and lamps.
– Start with two crates and grow your setup as needed.
10. Upcycled Crate Storage
Editor’s Choice

Wooden Crates 2 Pack, Rustic Handmade Wood Crate with Handles, Durable L…

Romeda 8-Pack Sandpaper Block, Four Grits Per Pack 60/80/120/220, Washab…

GE All Purpose Silicone Caulk, Clear, 10 fl oz Cartridge, 1 Pack – 100% …
You might also like
11. DIY Bedspread

Want a cozy bed without spending a lot? A handmade bedspread adds warmth and a personal touch to your space.
Here’s how to build one that fits your room.
– Gather fabric: choose old quilts, shirts, or colorful prints you love, cut into squares.
– Cut into squares or strips, sized to fit your bed and your skill.
– Sew pieces into a grid or random layout, use a straight stitch, and press seams as you go.
– Add batting for softness and warmth, then baste layers to avoid shifting.
– Finish with a backing and stitch around the edges, or quilt top and back together for a snug finish.
– Bind the edges for a clean, durable edge that holds up to regular use.
Choose colors to match your walls and sheets, or go bold with bright patterns. Think texture matters; mix soft flannel with smooth cotton for a cozy feel. If you have a sewing machine, use a zigzag or overcast stitch to seal edges.
Tips:
– Use fabric easy to wash.
– Make matching pillows for a cohesive look.
Unique Insight:
– Learning basic sewing opens many DIY possibilities.
Here is why this works: it uses scraps you own and makes a practical bedspread.
Start small, finish in a weekend. You can finish this in a couple of evenings.
11. DIY Bedspread
Editor’s Choice

Brother XM2701 Sewing Machine, Lightweight, Full Featured, 27 Stitches, …

anezus Self Healing Sewing Mat, 12inch x 18inch Rotary Cutting Mat Doubl…

Coquimbo Sewing Kit Gifts for Mom Grandma Women Men Adults Kids Teen Beg…
12. Washi Tape Decor
Want a quick, budget-friendly way to refresh your bedroom? Washi tape is the answer. It is a thin paper tape with a gentle glue. It sticks to walls, furniture, and switch plates without leaving big marks. That makes it renter-friendly and easy to change.
Here is why it works. It brings color and patterns with almost no effort. You can draw borders around a mirror, frame a photo wall, or add stripes on a dresser top. The tape is easy to cut and move. You can test ideas before you commit.
Tips:
– Mix and match patterns for a lively look.
– Use washi tape to label storage boxes for quick organization.
Seasonal insight:
Change your tape colors with the seasons for a fresh feel every few months.
Next steps:
– Pick 2-3 colors that match your bed sheets.
– Try a simple border on a wall or a dotted stripe along a desk edge.
– Swap the tape on a light switch cover to try a new style without tools.
Start small. Try a single border on one wall or a stripe along a desk edge. Pick two tape colors that match your sheets. If you want a quick change, peel it off and reapply somewhere else. It comes off cleanly on smooth surfaces, so you can experiment freely.
12. Washi Tape Decor
Editor’s Choice

40 Rolls Washi Tape Set, Decorative Masking DIY Plain Washi Tapes for Ch…

150 Pcs Labels for Storage Bins, 6 X 4 Inch Removable Labels for Storage…
13. Cozy Blanket Ladder
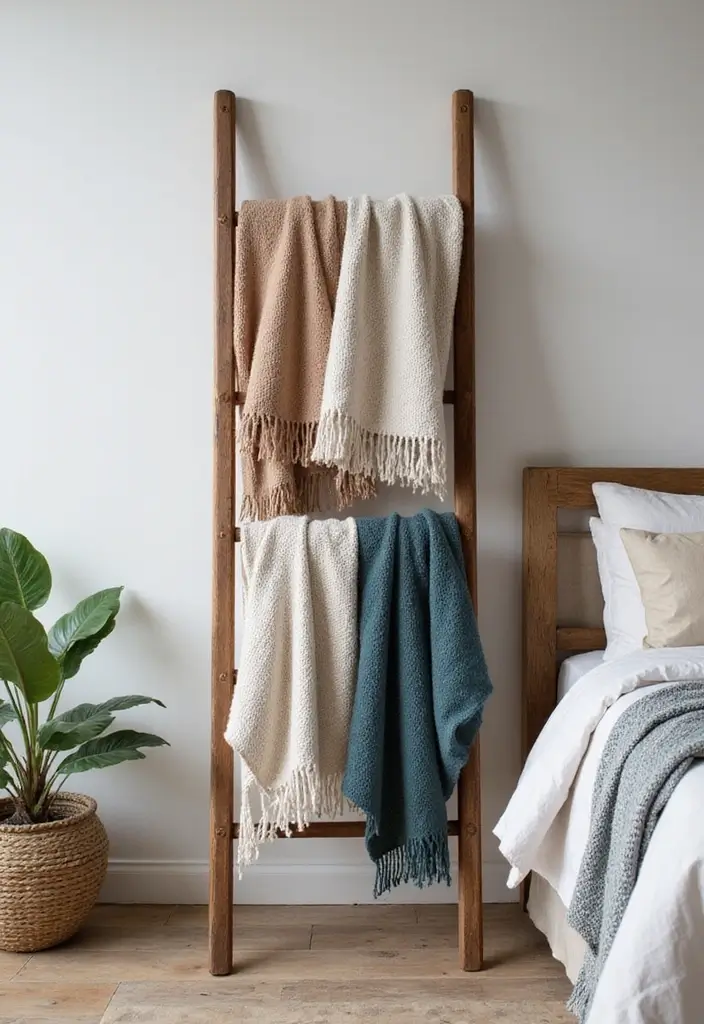
You want a simple way to keep blankets handy and your bedroom tidy. A cozy blanket ladder does both. It uses wooden dowels and a couple of boards and leans against the wall to show off your throws. This adds warmth and a simple focal point to your space.
Here is how to build one.
What you need
– Two boards and several wooden dowels for the rungs
– Wood screws or nails plus wood glue
– Sandpaper, stain or paint in the color you love
– Measuring tape, a saw, a drill, and a screwdriver
– A clean work surface and clamps (optional)
How to assemble
1) Cut the boards to your desired length for the side rails.
2) Space the rails and mark even spots for the rungs on the inner face.
3) Attach the dowels by gluing and screwing or nailing them into place.
4) Sand smooth, then stain or paint. Wipe away any dust.
5) Let it dry fully before you move it into place. Lean it against the wall near your bed.
Placing and styling
– Arrange blankets by texture and color for depth.
– Mix a chunky knit with a soft fleece and a thin cotton throw.
– Keep the ladder low enough to reach easily.
Tips:
– Use varying textures and colors for the blankets.
– Place the ladder near your bed for easy access.
Unique Insight:
– Change the vibe with seasonal blankets. Swap in a festive plaid for winter or a light linen throw for spring.
13. Cozy Blanket Ladder
Editor’s Choice

FUIN 57in Wood Blanket Ladder Living Room Decorative Wall Leaning Farmho…

Gorilla Wood Glue; 8 Ounce Bottle; Natural Wood Color; (Pack of 1)

3M Aluminum Oxide Sandpaper, 5 Sheets, Assorted Grit 100-150-220, 9-in x…
14. DIY Rug
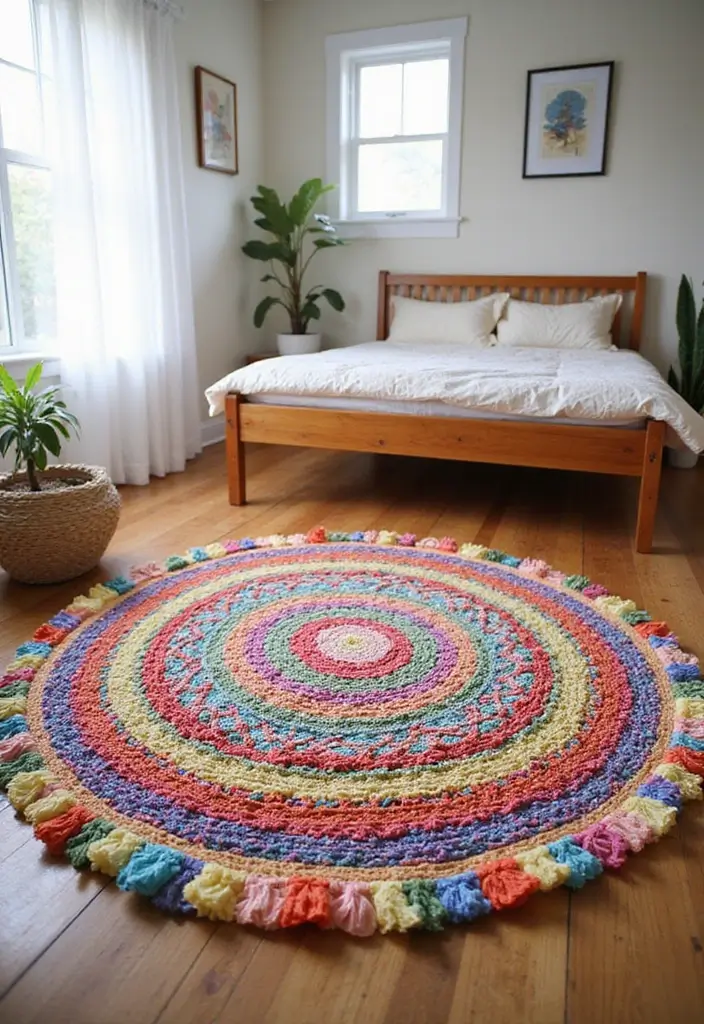
You want a rug that fits your room and budget. A DIY rug made from fabric scraps can do the job. It lets you pick colors and sizes that match your space. This project is simple, and you can finish it over a weekend.
Here is why it works: you reuse old stuff and get a one-of-a-kind piece you’ll actually love.
What you need
– Fabric scraps or old t-shirts, cut into 2–3 inch strips
– Yarn for extra texture
– Scissors
– A needle and strong thread or a simple loom kit
– Non-slip rug pad or thick felt
– Measuring tape or ruler
– A sturdy work surface
Steps
1) Choose your look. You can braid for a flat, casual rug or coil for a rounder shape.
2) Cut all scraps into even strips, about 2–3 inches wide.
3) Braid each strip into a long cord.
4) Coil the braids into your rug shape and sew or stitch as you go.
5) Trim loose ends and secure the edges with a few stitches.
6) Lay the rug on a non-slip pad and press to set it in place.
Tips
– Use a non-slip underlay to keep the rug from sliding.
– Try different braiding and weaving styles to change the feel of the rug.
Unique Insight
– Dip the edges in a splash of paint for a bold, modern touch.
Next steps: place the rug where you walk most and enjoy the personalized vibe it brings to your bedroom.
14. DIY Rug
Editor’s Choice

GORILLA GRIP Strong Rug Pad Gripper, US Designed, Grips Keep Area Rugs S…

UCDRMA Loom Knitting Kit with Yarn, 23PCS Round Knitting Loom Kit for Be…

Fabric Scissors Professional, 8″ Heavy Duty Sewing Scissor for Fabric Cu…
15. Handmade Dreamcatcher
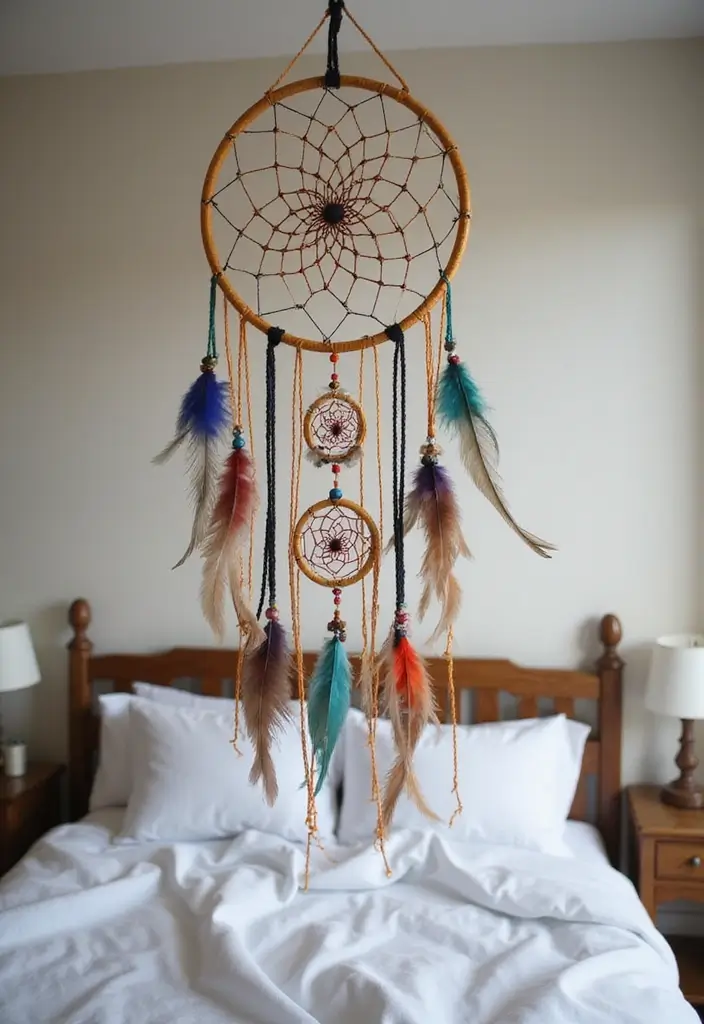
Looking for a calm, stylish room on a tight budget? A handmade dreamcatcher can be your answer. It adds boho charm and a soft, welcoming feel to any wall. Hang it above your bed, and you have a focal point you can enjoy every night.
Here is how to make it. Start with a simple hoop. Tie a few strands of string to build a small web. Add feathers and beads to finish the look. Pick colors that fit your room, or go bold for contrast. This piece works best when the colors match your sheets or rug. Hang it above your bed and you invite a sense of calm every time you turn off the lights. You can tell a story with the colors and pieces you choose.
Tips:
– Use natural elements like twigs or dried leaves for a rustic feel.
– Mix bead colors to reflect your mood or the season.
– Try different feather shapes for texture.
Unique Insight:
Personalize with charms that stand for your dreams. A small charm, a tiny tag, or a token can remind you of your goal. This adds meaning and makes the piece truly yours.
15. Handmade Dreamcatcher
Editor’s Choice
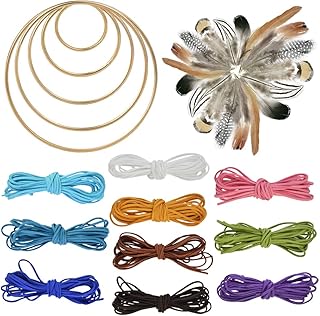
Nydotd 125Pcs Dream Catcher Making Kit, 15 Pcs Metal Rings Hoops Macrame…

FeelfunFeather 300 pcs Small Feathers – 10 Style Mixed Spotted Decorativ…

Assorted Glass Beads for Jewelry Making, DIY Lamp Work, Arts and Crafts,…
16. DIY Headboard Wall Mural
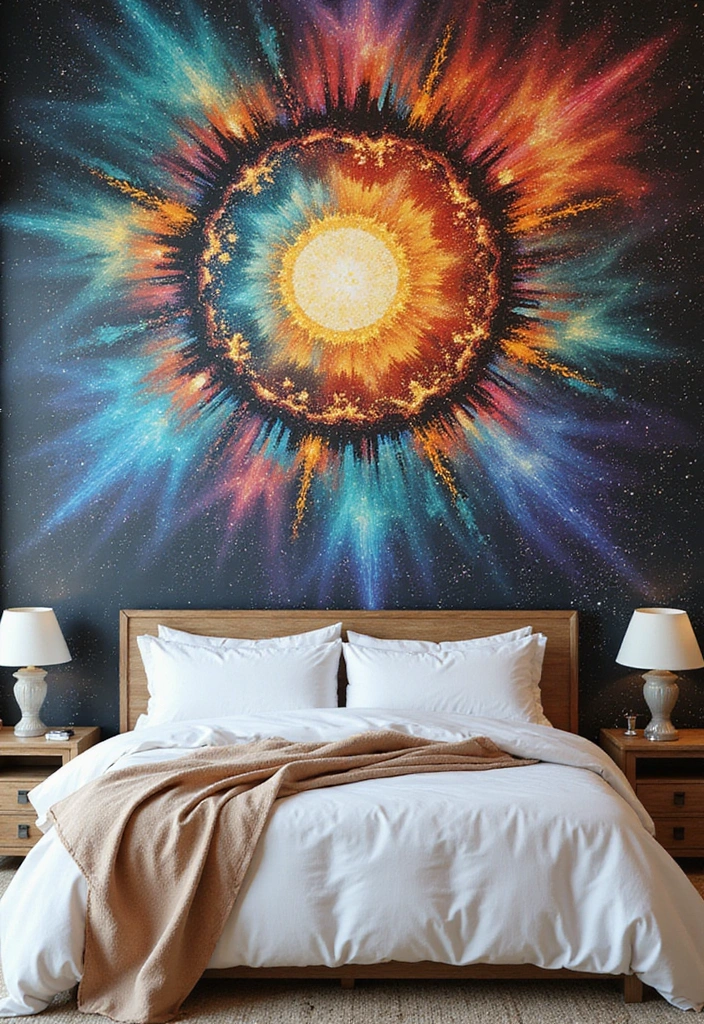
You want a bold look above your bed without a big price tag. A DIY headboard wall mural gives you a strong focal point you can tailor to your taste.
Style ideas
Choose a mood you love. A soft landscape adds calm. A bold geometric line makes a modern splash. A floral panel adds warmth and texture. Test small samples on cardboard before painting.
What you need
– Paint in your chosen colors
– Stencils or removable decals
– Painter’s tape, a level, a pencil
– A small roller or brush
Steps to create it
– Step 1: Prep the wall. Wipe dust and dry any spots.
– Step 2: Tape edges with painter’s tape for clean lines.
– Step 3: Lightly sketch or trace your design.
– Step 4: Apply paint in thin layers or place decals carefully.
– Step 5: Remove tape while the paint is still slightly damp.
– Step 6: Touch up edges and let the finish dry fully.
Tips
– Check color choices in natural light.
– Start simple if you are new to murals.
– Keep a damp cloth handy to fix spills quickly.
– If you use decals, remove backing slowly and align as you go.
Why it helps
A mural can create depth and the feel of more space in a small room. It also adapts as your decor changes.
16. DIY Headboard Wall Mural
Editor’s Choice

Acrylic Paint Set, 24 Colors (2 oz/Bottle) with 12 Art Brushes, Art Supp…

Sinekong Large Inspirational Quote Wall Decals, Removable Positive Sayin…
4 Rolls Premium Painters Tape, Blue Tape, Masking Tape, Paint Tape for M…
17. Cozy Reading Nook
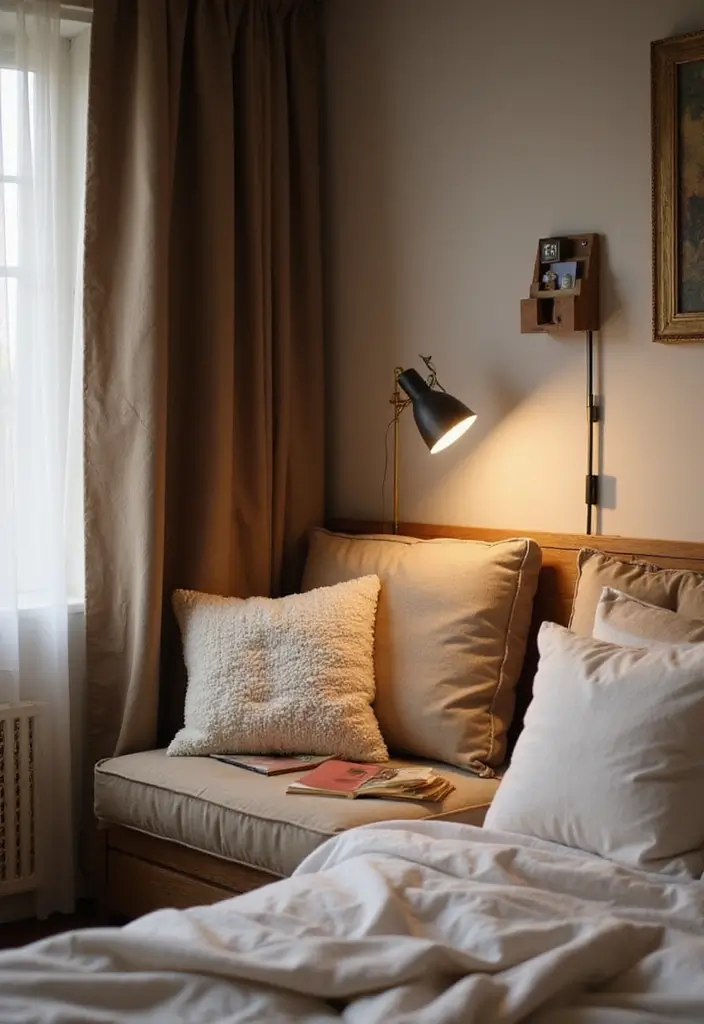
Are you after a quiet spot in your bedroom to read, without spending a lot? Build a cozy reading nook that fits your space and your budget. This little corner becomes a daily retreat where you can slow down and enjoy a good book.
– Choose a corner or a window seat. Add floor cushions and a small bookshelf or side table to hold your current reads.
– Light it right. Use string lights for a soft glow or set a small lamp nearby so you can read without eye strain.
– Layer for comfort. Put in a soft throw blanket, a few plush cushions, and even a tiny rug if the floor feels cold.
– Stay organized. A woven basket keeps books, magazines, and bookmarks easy to grab and easy to put away.
Tips:
– Include a soft blanket for extra coziness.
– Keep the area tidy with a small basket for books.
Unique Insight:
– Paint the wall behind your nook a shade that stands out yet blends with your room. A different color helps the space feel intentional and inviting.
Next steps? Gather a few cushions, pick a light, and try this setup in a corner you actually use. Adjust cushion positions and lighting until it feels right. Soon you’ll have a go-to place to wind down, one page at a time.
Create a cozy reading nook in your bedroom, and discover the magic of unwinding with a good book! Just a little corner, some cushions, and the right lighting can turn your space into a daily retreat.
17. Cozy Reading Nook
Editor’s Choice

Meditation Floor Pillow Set of 2, Square Large Pillows Seating for Adult…

JMEXSUSS 100 LED Connectable Globe String Lights Indoor Bedroom, 33ft Wa…

Storage Baskets for Organizing, Woven Decorative Baskets for Shelves – B…
18. Decorative Throw Pillows
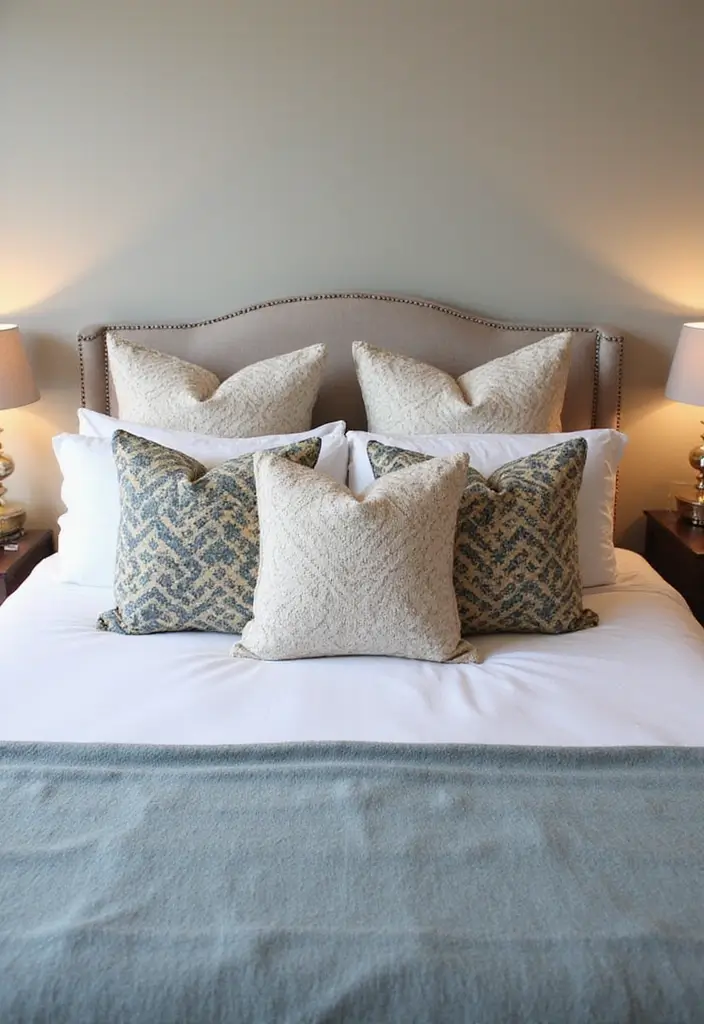
If your bed looks plain, decorative throw pillows can change that fast. They add color, texture, and warmth without a big spend. You can sew pillow covers from scraps or old clothes. It’s simple and rewarding.
What you need
– Pillow inserts or old pillows to reuse
– Fabric scraps or old garments
– Thread and a needle or a sewing machine
– Scissors, pins, and a ruler
– Optional: a zipper or an envelope opening for easy washing
The basics
– Cut fabric slightly larger than the insert to leave room for a seam.
– Sew two fabric pieces together with the right sides facing each other.
– Turn the cover right side out and insert the pillow.
– Keep your colors cohesive to tie the bed together.
How to mix styles
– Use different shapes and sizes: square 18×18, 20×20, and a long bolster.
– Mix textures like soft cotton, linen, and knit for depth.
– Vary patterns but stay in the same color family for a calm look.
Tips
– Use different patterns but keep a common color scheme for cohesion.
– Don’t forget to stuff them with quality filling for comfort.
– Wash removable covers regularly to keep your bed fresh.
Seasonal refresh
– Swap pillow covers as the seasons change to give your room a quick lift.
Next steps
– Pick a color idea, gather scraps, and start with two covers. You’ll see the room come alive in minutes.
Transform your bedroom with DIY decorative throw pillows! A splash of color and texture can make your space feel like home without breaking the bank. Get creative and let your personality shine!
18. Decorative Throw Pillows
Editor’s Choice

Utopia Bedding Throw Pillows (Set of 4, White), 18 x 18 Inches Pillows f…
Brother XM2701 Sewing Machine, Lightweight, Full Featured, 27 Stitches, …

150Pcs 4″ x 4″ (10cm x 10cm) Cotton Craft Fabric Bundle Squares,Squares …
You Might Also Like

19. Personal Memo Board
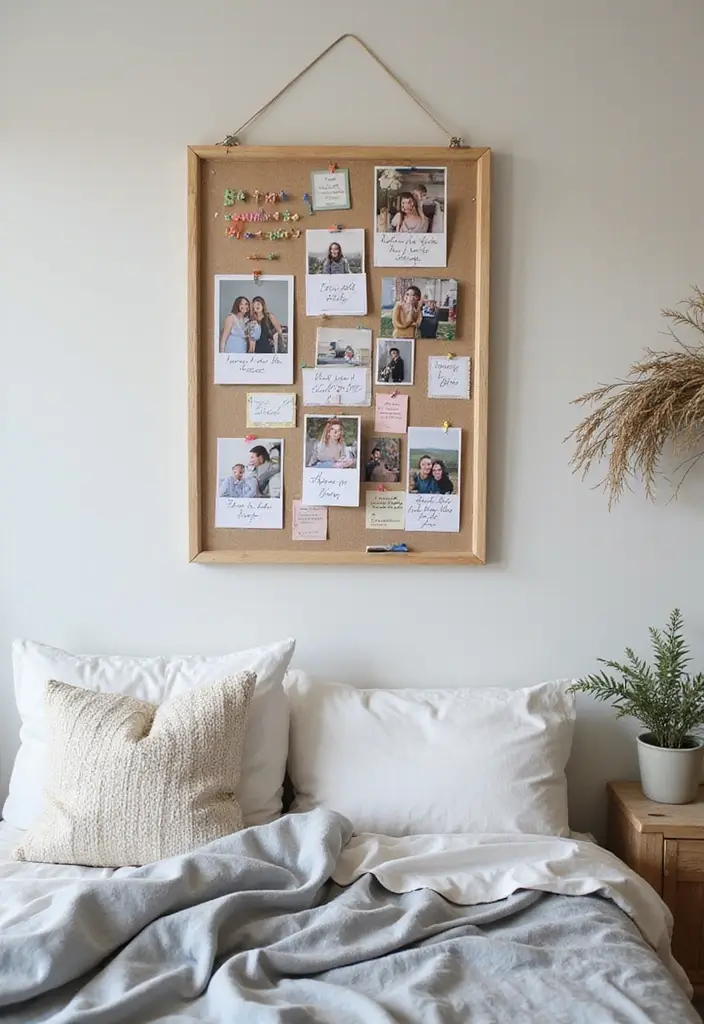
If you want a simple way to keep ideas in view, a personal memo board helps. It holds quotes, photos, tasks, and reminders all in one place. It brightens the room and clears your desk. You can make it with stuff you already own. You’ll feel calmer when you can glance at a neat board instead of a growing pile on the nightstand.
Here is how to make it in easy steps:
– Find an old frame that looks sturdy and clean.
– Choose corkboard or a piece of fabric that fits behind the frame.
– Cut the backing to size, then attach it tightly to the frame.
– Put the back on, hang the board where you’ll see it every day, at eye level.
– Clip in your items as you go, from quotes to photos to reminders.
What to display keeps changing with you. Use colored pins for color cues. Put important reminders in a bright corner, and tuck lighter notes in a corner for daily motivation. Swap out items weekly to keep the board fresh and useful.
Tips:
– Use fun pushpins or clips for extra flair.
– Hang it at eye level for quick access.
Unique Insight:
– Create a mood board with colors and images that lift your daily mood.
19. Personal Memo Board
Editor’s Choice

Large Cork Board Alternative | 15 Pack | Sizing Up to 59”x36”, Felt Wall…

60 Pcs Push Pins, Thumb Tacks for Decorative Wall, Pearl White Thumbtack…
LUCKYLIFE Picture Frames Collage Wall Decor 10-Pack, Gallery Wall Frame …
20. DIY Candle Holders
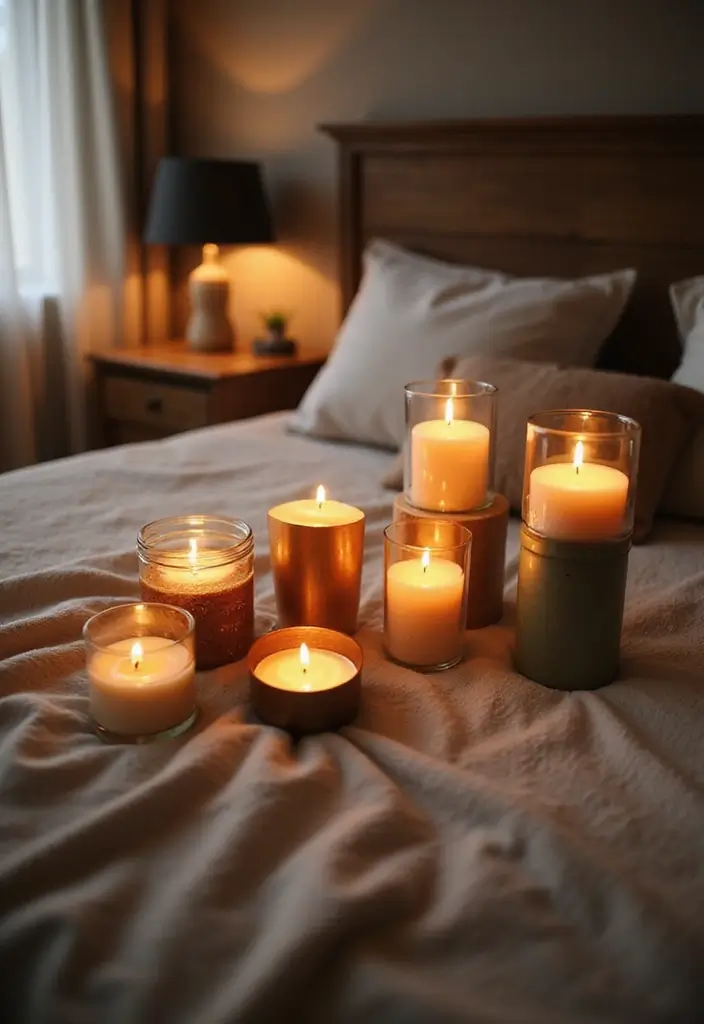
If you want a cozy bedroom without a big price tag, DIY candle holders are a smart move. They bring warmth, style, and a personal touch to your space. Use simple materials and safe lighting to create soft glows that match your mood and decor.
– Mason jar lanterns
Here is why they work: jars soften light and look chic on a nightstand or shelf. What you’ll do: gather a mason jar, a battery LED tea light, and some scrap materials like twine, paint, or a thin ribbon. Wash the jar. Wrap twine around the neck, dab paint for stripes, or leave it clear for a clean look. Slip in the LED candle. Place the jar on a tray with a few small stones or pine cones for texture. Safety tip: always use LED candles in fabric or paper holders.
– Tin can holders
Next steps are simple and budget friendly. Clean the cans and remove sharp edges with sandpaper. Create a pattern by punching small holes or cutting simple shapes. Paint or wrap with burlap, twine, or soft yarn. Insert an LED light or tealight. Set them on your dresser with a few decorative lids or a low-sided tray. Here is why this works: metal and light textures add an urban-rustic vibe.
– Branch slice holders
This design brings nature indoors. Find a sturdy branch piece o f about 1 to 2 inches thick, slice into rounds, or use a single thick branch as a base. Carve a shallow notch on the top so an LED candle sits flat. For safety, use LED candles only. You can finish the surface with a light stain or clear sealant to protect it. Place on a low table or windowsill to catch the eye from across the room. Let the wood’s grain do most of the talking.
– Quick safety and style notes
– Use LED candles for all designs when possible.
– Mix heights for visual interest; stagger on a dresser or tray.
– Pair with a few scented options to boost mood.
– Scented candle insight
Scented candles lift mood and enhance decor without extra clutter. A gentle vanilla or pine scent can calm a busy day. If you want subtle aroma, place a small ceramic dish with wax melts near the holders.
What to do next
Choose one design that matches your room’s style. Gather the items this weekend and start small with a single piece. You’ll see an instant glow that makes your bedroom feel more inviting.
20. DIY Candle Holders
Editor’s Choice

Homemory 24Pcs Flickering Flameless Candle Battery Operated, 200+Hours F…

Ball Wide Mouth Glass Mason Jars with Lids and Bands, Used for Canning, …

Acrylic Paint Set for Adults and Kids – 24 Pack of 12mL Paints with 3 Ar…
21. Painted Furniture Accents
You want a quick, affordable way to refresh a room. Painted furniture accents give you this in hours, not days. You don’t have to repaint every inch. A small touch can wake up neutral furniture.
Here is why it works: bold color on limited spots creates contrast. It draws the eye and keeps the look simple. You control the vibe with color and placement.
Where to paint? Try drawer fronts, chair legs, or shelf edges. These areas are easy to reach and quick to fix. Pick a bright shade that stands out against the rest of the piece. The result feels fresh, not loud.
Tips:
– Use chalk paint for a matte finish and easy distressing.
– Seal the area with a protective coat so it lasts.
– Tape clean lines to keep colors crisp.
Unique Insight:
– Paint just the curves or edges to highlight the piece’s shapes.
Next steps:
– Do a small test on a hidden spot to see how the color looks in your light.
– Apply one thin coat, let it dry, then add a second if needed.
– Lightly sand between coats for a smooth finish.
– Finish with your seal or wax, then reattach hardware.
A simple choice can lift a whole room. Try it this weekend and enjoy the lift without a full makeover.
What color fits your space: start with neutrals on the main body and pick one bold accent. For a modern vibe, try teal or forest green. For a cozy look, a rusty orange or soft pink can work.
What you need: chalk paint or acrylic, a sealant or wax, brushes, painter’s tape, sandpaper, and a clean cloth.
21. Painted Furniture Accents
Editor’s Choice
Rust-Oleum 206540 Chalkboard Brush-On Paint, 30 oz, Black

Clear Coat – Eco-Friendly Clear Satin Sheen Top Coat for Chalk Style Fur…
4 Rolls Premium Painters Tape, Blue Tape, Masking Tape, Paint Tape for M…
22. Upcycled Window Frame
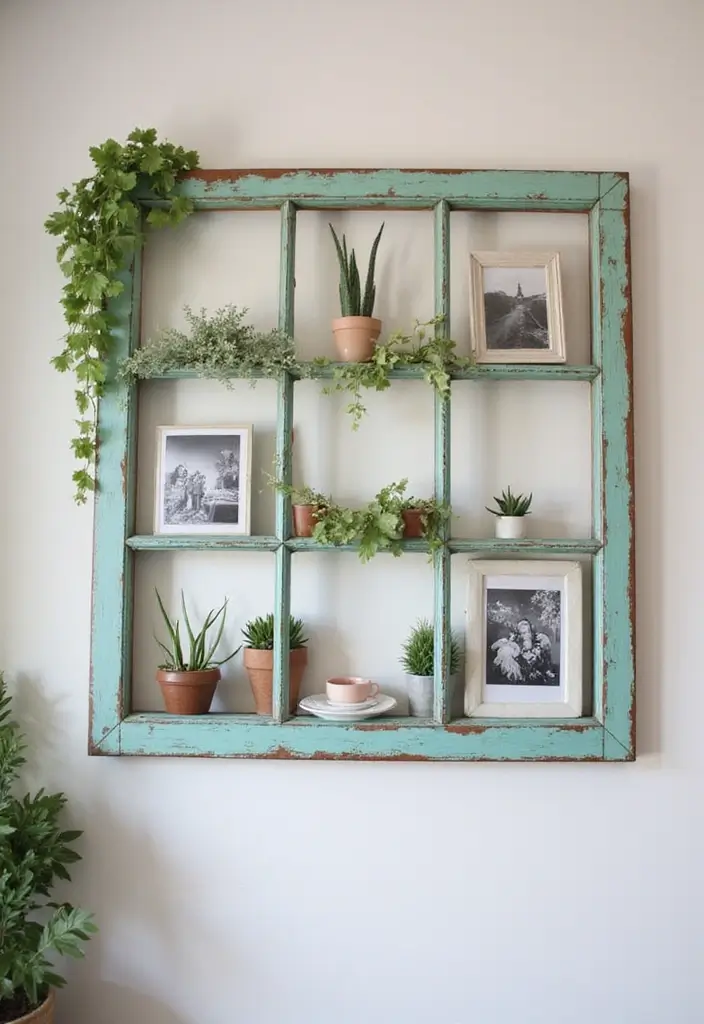
Tired of a plain wall in your bedroom? An upcycled window frame can change that with little cost and a lot of charm. It gives your space a cozy, vintage feel without making a big mess of your budget. You can turn a dusty frame into eye catching wall art or a small display shelf.
Here is how you can make it yours:
– Clean the frame thoroughly. Wipe away dust and grime. Let it dry completely before you start.
– Sand lightly and pick a finish. Paint it in a color you love or stain the wood for a warm, natural look.
– Decide how you want to use it. Hang it on the wall as art or turn it into a tiny shelf for items.
– Dress it up with items you already own. Clip a photo, tuck in a tiny plant, or arrange a few keepsakes on the ledge.
– Keep things secure. Use soft putty or tiny clips so photos and trinkets stay in place.
– Add texture with a mix of glass and wood. A pane or two can give contrast and depth.
Tips:
– Secure items well if using as a display.
– Use a combination of glass and wooden elements for more texture.
Unique Insight:
– Slip fairy lights inside the frame for a warm, illuminated display.
22. Upcycled Window Frame
Editor’s Choice

6 Pack Fairy Lights Battery Operated – 7ft 20 Led Twinkle Lights 3 Modes…

Wood Stain Powdered Solvent – Wood Dye – Indoor and Outdoor Furniture an…
23. Handmade Bath Tray
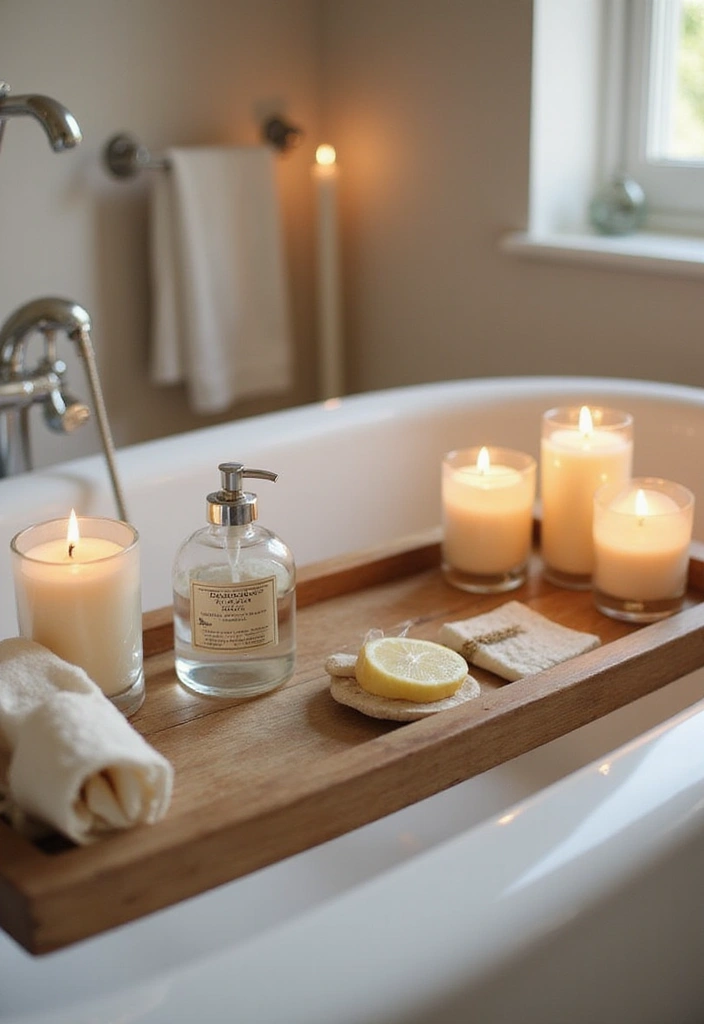
You want a bath tray that brings a calm, spa feel to your bathroom without breaking the bank. A handmade bath tray made from reclaimed wood gives you a sturdy place for soap, a candle, and a good read. It also doubles as decor when you’re not using it. Here is a simple plan to make one and keep it looking great.
– Measure the width of your tub. This tells you how wide the tray should be.
– Pick clean, flat reclaimed boards. Look for straight edges and a smooth finish.
– Sand everything smooth so no rough spots touch your skin.
– Cut a simple frame and add two small end supports. This keeps the tray steady across the tub.
– Glue and nail the pieces together, then wipe away dust.
– Apply a waterproof sealant or a food-safe oil. Let it dry completely before use.
– Add little touches like a groove for a book page or a candle rest if you like.
Here is why this works. It uses inexpensive materials, and you control the style, from natural wood to a whitewash look. It stays sturdy with basic tools and clear steps.
Tips:
– Customize sizes to fit your tub perfectly.
– Consider adding a section for a wine glass holder!
Unique Insight: Crafting a matching set, like a soap dish or a small tray, can lift your bathroom vibe.
Next steps: wipe it down after baths, re-seal yearly, and store extra pieces with your bath basics.
23. Handmade Bath Tray
Editor’s Choice

ROYAL CRAFT WOOD Premium Foldable Bathtub Tray Caddy – Wood Bath Tray fo…

Olympic WaterGuard 11 oz. Clear Exterior Waterproofing Wood Sealer Spray

Dura-Block Set 6pc – Flexible EVA Foam Wet or Dry Autobody Sanding Block…
24. DIY Closet Organizers
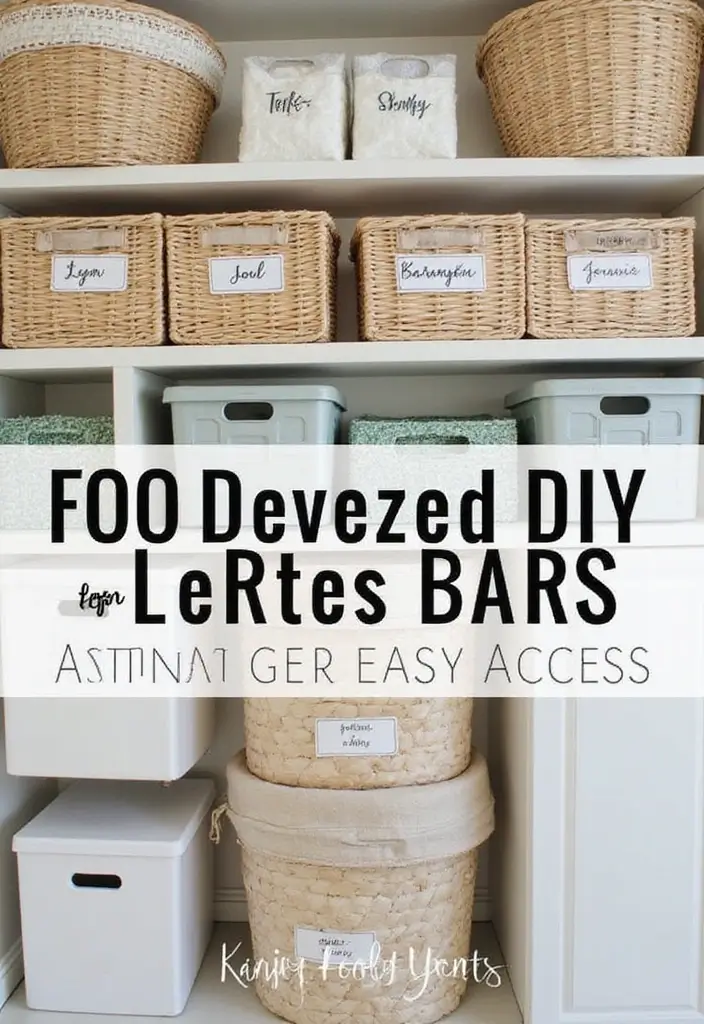
Is your closet crowded and kind of a mess? You want easy access to clothes and stuff without breaking the bank. DIY closet organizers can help you get there. Here is a practical, budget-friendly plan that fits real life.
Here is why this approach works for busy homes. Small changes add up fast. Simple materials keep costs low, and you can see what you have at a glance.
– Use cardboard boxes, fabric baskets, or repurpose old crates to create custom storage zones.
– Color code or label boxes so you know where everything goes.
– Choose clear containers for quick finding.
– Hang items vertically to free up floor space.
– Add shelf dividers or a slim shoe rack to separate items.
– Hang a wire organizer on the back of the door for small items.
Here is how to put it together:
– First measure your closet and list what you store. Then decide on zones for clothes, shoes, and accessories.
– Pick a simple system: stacked bins on a shelf, a hanging organizer, or a mix.
– Mount a slim rod for a mini wardrobe and place baskets on higher shelves for seasonal pieces.
Tips:
– Use clear containers to easily spot items.
– Label each container or bin.
– Keep the most used items within reach.
Unique Insight:
– Regularly declutter and reorganize for the best use of your space.
Next steps:
– Do a quick audit every few months and rotate outfits.
24. DIY Closet Organizers
Editor’s Choice

Sterilite 4-Pack Ultra Latching Box, Storage Bins with Lids, Clear Plast…

BOOMIBOO Hanging Closet Organize and Shelves,5-Hanging Shelf with 2 Side…

HBlife 6 Pack Closet Organizers and Storage, Clear Shelf Dividers, Verti…
25. Wall-mounted Folding Desk

Small rooms can feel crowded. You need a desk that gives you real work space without taking over the floor. A wall-mounted folding desk does just that. It stays out of the way when you’re done and you get room to breathe again.
Here is why it works. It creates a true spot to work or study. When you finish, it folds flat against the wall. You can build one with simple wood, a pair of brackets, screws, and a finish you like. This kind of space-saving desk fits a kid’s room or a cozy dorm and keeps your home office tidy too.
Here is what you need to get started:
– A wood board cut to the size you want for the desk surface
– Two sturdy brackets or a folding hinge system
– Screws, wall anchors, and a drill
– A finish such as paint, stain, or a clear coat
– Optional: a slim chair that can tuck under the desk
Here is how to set it up:
– Mark a place on the wall and find wall studs for support
– Attach the brackets or hinge system to the studs
– Secure the desk surface to the brackets and check it with your laptop
– Apply color or stain to match your decor
– When folded, give the wall a clean, flat look
Now you can decorate. Add a small plant or a few framed photos on the desk top to personalize it.
Tips:
– Make sure it’s sturdy enough to hold your laptop and other items
– Pick colors that match your room’s decor
Unique Insight:
– Pair the desk with a compact chair that tucks under the surface when you fold it away
25. Wall-mounted Folding Desk
Editor’s Choice

HOOBRO Folding Table, Wall Mounted Desk, Floating Wall Desk with Iron Br…

2Pcs Heavy Duty Shelf Bracket Countertop Support Brackets 16″x12″ Wall M…

Portable Camping Chair – Compact Lightweight Folding Chair for Adults, S…
Conclusion
Revamping your bedroom doesn’t require spending a fortune. With these 25 DIY bedroom decor ideas, you can transform your space into a personal sanctuary that reflects your unique style.
Whether you’re crafting handmade decor or repurposing old items, every little change adds to the overall vibe of your retreat.
So gather your materials and let your creativity flow—your dream bedroom is just a project away!
Note: We aim to provide accurate product links, but some may occasionally expire or become unavailable. If this happens, please search directly on Amazon for the product or a suitable alternative.
This post contains Amazon affiliate links, meaning I may earn a small commission if you purchase through my links, at no extra cost to you.
Frequently Asked Questions
What Are Some Easy DIY Bedroom Decor Ideas for Beginners?
If you’re new to DIY, start with simple projects like string lights for ambiance or decorative throw pillows to add color to your bed. These projects require minimal skill and materials while creating a big impact on your room’s atmosphere.
Additionally, consider making a personalized photo collage or washi tape decor for a quick and affordable way to express your style!
How Can I Transform My Bedroom on a Tight Budget?
Transforming your bedroom on a budget is all about creativity and resourcefulness! Focus on upcycled furniture like nightstands or dressers, which can add charm without breaking the bank.
You can also make DIY wall art with simple supplies or create a cozy reading nook with just a few cushions and a blanket. Remember, it’s all about making the space feel personal and comfortable!
What Materials Do I Need for DIY Bedroom Decor Projects?
The materials you’ll need can vary by project, but common items include fabric for curtains and headboards, wood for shelves or storage, and paint for furniture accents. Don’t forget basic supplies like glue, scissors, and tools!
Repurposing items you already have can also save money and add uniqueness to your decor.
Are DIY Bedroom Decor Projects Time-Consuming?
Not at all! Many DIY bedroom decor projects are designed to be quick and easy. For instance, creating painted dresser drawers or hanging wall shelves can typically be done in a few hours.
Choose projects that fit your schedule and skill level, and you’ll be amazed at how quickly you can refresh your space!
How Do I Choose the Right Color Scheme for My DIY Bedroom Decor?
Choosing the right color scheme is essential for creating a cohesive space. Start by considering the mood you want to cultivate—calming blues and greens are great for relaxation, while vibrant colors can energize the room.
Use a color wheel to find complementary colors or start with a favorite item, like a blanket or piece of art, and build your palette from there. Trust your instincts, and don’t hesitate to experiment!
Related Topics
diy bedroom decor
budget-friendly
home decor
creative ideas
upcycled furniture
easy projects
cozy spaces
personalized decor
wall art
storage solutions
boho style
quick updates

")
")


I loved these DIY ideas! I once turned an old ladder into a bookshelf, and it became the coolest piece in my room. What’s your favorite DIY project you’ve done?